I’ve been into Ansible lately, and wanted to find out if I can automate Windows configuration using it.
Now, for me personally, installing a new Windows server is always a drag. After using Red Hat’s Kickstart and Debian’s Preseed to automate Linux installations, I needed something similar to automate Windows deployments.
The Goal
To prevent all of the user interface pages from Windows Setup from being displayed during installation and have it fully automated.
Before We Begin
We can automate Windows installation by using an answer file.
There are three steps to the process:
- Download Windows server ISO file
- Create an answer file
autounattend.xml - Add the answer file
autounattend.xmlto the ISO file
Configuration
Download Windows Server ISO
Navigate to https://www.microsoft.com/en-us/evalcenter/evaluate-windows-server-2016 and download a Windows Server 2016 evaluation ISO.
At the time of writing, I have no experience with Windows Server 2019 hence using Windows Server 2016 that I am familiar with.
Create autounattend.xml
I used the Windows System Image Manager to create my unattended Windows Setup answer file.
I also used the Windows Setup reference that describes all of the unattended settings that can be set in Windows Server 2016. Link below for references.
https://docs.microsoft.com/en-us/windows-hardware/customize/desktop/unattend/components-b-unattend
It was a lengthy process based on trial and error.
You can view my autounattend.xml here.
Add autounattend.xml to ISO
I ended up using a third party tool to achieve this. Here is what I did.
Create a KVM guest using the Windows Server ISO file that we downloaded earlier.
# virt-install \
  --name windows2016 \
  --ram 6144 \
  --vcpus 2 \
  --disk path=/var/lib/libvirt/images/windows2016.qcow2,size=40 \
  --os-type windows \
  --os-variant generic \
  --network network=default \
  --cdrom Windows_Server_2016_Datacenter_EVAL_en-us_14393_refresh.ISO \
  --sound none \
  --virt-type kvm
Log into the Windows server and create two diretories:
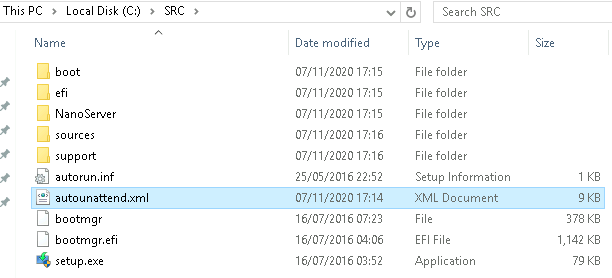
C:\SRC\
C:\OUTPUT\
Use the mounted Windows Server ISO as a DVD and copy all files to C:\SRC\, including autounattend.xml.

Download and install ImgBurn.
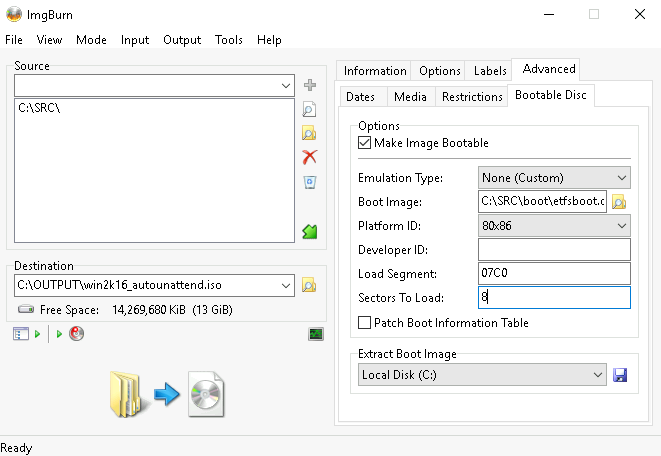
Use ImgBurn to create an ISO file from a directory. Navigate to “Advanced > Bootable Disk” and tick the box to “Make Image Bootable”.
Set “Source” as C:\SRC\. Set “Destination” as C:\OUTPUT\win2k16_autounattend.iso.
Use boot\etfsboot.com file from the DVD for “Boot Image”.
Set “Sectors To Load” to 8 when setting up a Windows Server 2016.

Build the image. Click Yes on all prompts that may follow.
The ISO file will be generated and saved as C:\OUTPUT\win2k16_autounattend.iso. Now use this ISO file to deploy an unattended Windows server.
